

Smoking & Grilling World
Building a Drum Smoker Equipped with FireBoard Drive
Recently we have spent some time smoking with old grilles fitted with a FireBoard Drive. If you haven’t had a chance, look at our blogs Upgrading and Old Grill, How to Smoke Pork on a Kettle, and our taste tests of Lump vs Briquette charcoal and Briquettes vs. Pellets. These blogs show the simplicity of adding FireBoard Drive technology to a garden-variety charcoal grill.

Thanks to Byron, for volunteering to pick up the drum.
Working on these articles made me deeply interested in using my FireBoard 2 Drive, on a drum-style smoker. Since FireBoard’s research and development collection of cookers does not include a drum, I decided to embark on a DIY journey of building our own drum smoker.

This will vary from person to person but the most unusual tool needed for this project will be something to drill a 1″ hole. We had a step bit that I used, but a hold saw will work fine too.
When looking at the kits there are many options to consider from a basic, kit like this one from Big Poppa Smokers to this stainless steel Super 55 that I saw on the sales floor at The Kansas City BBQ Store. These kits cost between $160 and $400, not including a barrel. Stainless Steel barrels can be purchased new for $150, and used non-stainless options are readily available on social media marketplaces and Craigslist. Prices can range slightly, but I found our drum on Craigslist for $30. For perspective, a brand new, fully assembled drum smoker from Gateway Drum Smokers can cost $1200, or more.

Lids are a personal touch. I cut the top of ours off with an angle grinder. Proceed with caution if you choose to go this route. Filling the drum with water serves as excellent leverage and can reduce a spark igniting the potential unknown contents of your drum. My grinding skills are lacking and I still need to spend some time leveling out the peaks and valleys for a decent seal.
But cost savings isn’t exactly the determining factor when on a DIY journey like this. Looking over the kits, it was clear that we could easily build our own Drive-enabled drum smoker with a trip to the local hardware store and a few parts from the FireBoard warehouse. The simplicity was compelling enough for me to build a smoker. Including a drum, the parts totaled less than $200.

The finished drum with handles, rack supports, ambient probe, and ball valve-ready air intake.

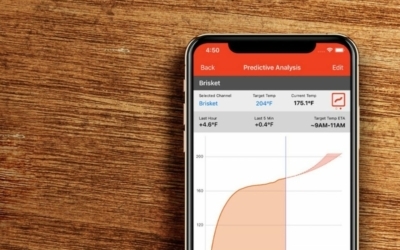
The Layers of the FireBoard Drum: the fire basket rests on top of two bricks placed parallel to the airflow of the FireBoard Drive Blower fan. Three levels of rack supports will allow for a deflector pan and up to two cooking racks above the deflector, spaced out 6 inches apart. I am planning on using an aluminum roast pan to catch drippings and deflect heat. Filling this up with some sand it acts as a collection tray for grease drippings which definitely keeps the smoker clean, but keeping the fat off of fire which can create some unwanted flavor when smoking.
The next day Byron and I took his pick-up to meet with the Barrel King of Kansas City, Kansas. There we selected a closed-head barrel with bung caps. The barrel king offered to cut our drum open with a hatchet and a hammer! This would leave us with a rim but no lid. This is not the end of the world, as lids from Weber Kettle grills fit the top of 55-gallon drums quite nicely. In fact, the grill grates we would be using are 22” Weber replacement grates. To keep the parts list low, I would be cutting the top off with the lip to create a functional lid. Though I’d really like to see the Barrel King’s hatchet method. How you address your lid will be your own choice. The minimalist philosophy of “less is more” has driven most of the decisions on this project.

Two black pipe couplers and one nipple fitting plus some silicone foam rubber were used to assemble an air intake for FireBoard’s Ball Valve Adaptor and Drive Blower.

Adding FireBoard’s Threaded Ambient Probe is a perfect finishing touch. I am looking forward to adding an ambient probe on a grill clip and comparing their readings.

The first burn in the fire basket of a DIY Drum Smoker with a FireBoard 2 Drive and Drive Blower attached.


About Author
Jeff Nichols
Related posts
Smoking & Grilling World
Smoking Chicken with FireBoard Pulse + Drive
The other week, Megan Day of Burnt Finger Barbecue joined the FireBoard team for a rooftop demonstration of how to use the FireBoard Pulse integrated…

Company News, Smoking & Grilling World, Tradeshows
The FireBoard Holiday Gift Guide for Grillers 2024
The holidays are here, and what better way to celebrate than with the gift of precision and control in the kitchen, at the grill, or on the job? Check out this year’s FireBoard holiday gift guide.

Company News, Smoking & Grilling World, Tradeshows
FireBoard at the 2024 American Royal
FireBoard once again attended the American Royal up at the Kansas Speedway, and we couldn’t be happier with how it turned out. Hosting nearly 250+ guests throughout Friday night, our event space was buzzing with energy, excitement, and more than a few curious faces who’d never heard of FireBoard before.
Meet the Team, Smoking & Grilling World
Beginners Cook a Tri-Tip Steak on a Primo Grill
If you’ve kept up-to-date with the FireBoard blog, you might be wondering: where are those weekly cooks they talked about doing? I want to see some beginners mishandle a brisket! Well, you’re in luck.
Meet the Team, Smoking & Grilling World
A Novice’s Perspective on FireBoard
A new FireBoard employee’s perspective on the business, the tech, and the process of learning how to cook like a pro (or at least like someone who knows what they’re doing.)
Leave a reply